Provisioning and Securing Your Home Lab and Startup Sandbox Network
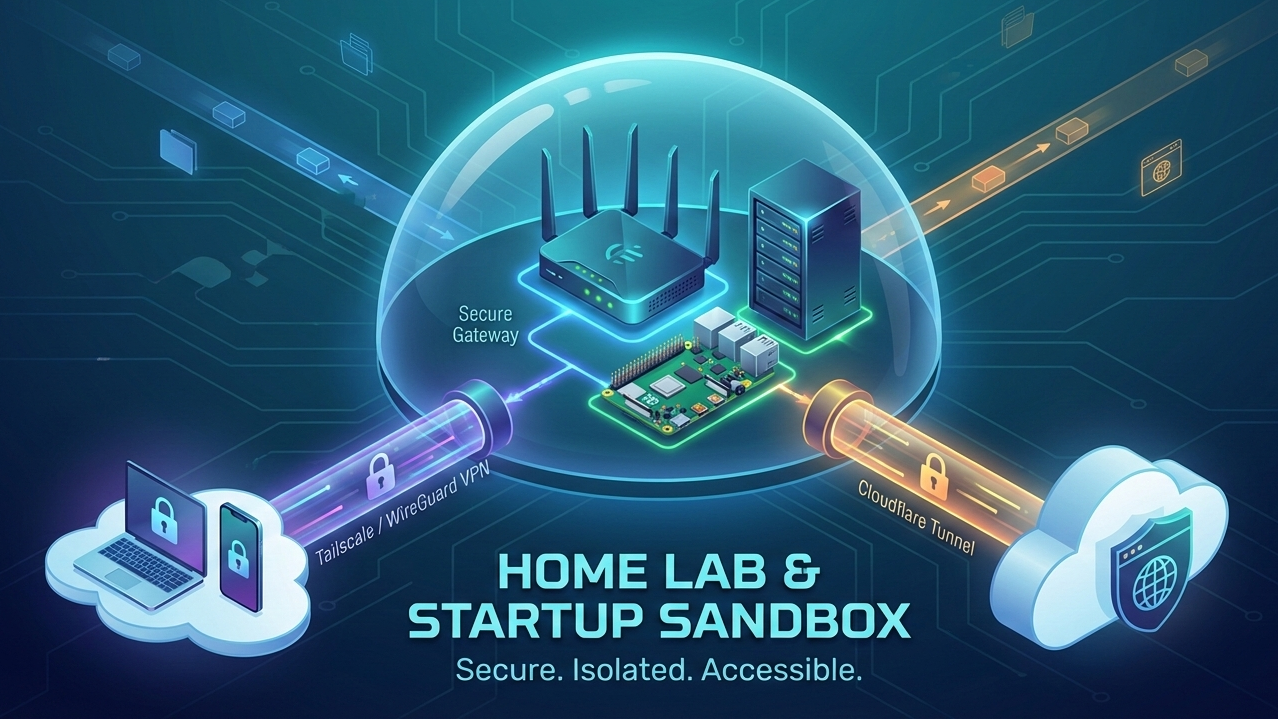 VPNs, Tailscale, WireGuard, and Cloudflare
You’ve built the perfect local environment or just got a new powerful desktop, but now you’re wondering how much more value can you get out of it.
Maybe you are a freelance developer who runs demos from a homelab or desktop but can’t accept inbound connections because their ISP blocks or NATs inbound traffic, or a bootstrapped startup trying to escape the "cloud bill shock" of running 24/7 dev environments on AWS, but you're terrified of the security risks that come with hosting on-prem.
The challenge is the same: You need reliable remote access, but you can’t afford to expose your entire network to the open internet. This article will show you how to solve that exact problem with practical, low‑cost patterns you can apply immediately.
What This Article Will (and Won’t) Do

This article will walk you through:
- Designing a safer network layout at the lowest cost
- Isolating critical infrastructure
- Setting up secure remote access with VPNs
- Exposing services safely without opening your entire network
What it won’t do is just as important.
This is not a strict Zero Trust implementation. The setup we’ll build moves you closer to Zero Trust, but it does not enforce identity at every internal network hop. We’ll talk about what that means and why that’s often a trade-off. Zero Trust deserves its own deep dive and it’s coming in a follow-up article.
It’s also not a cloud vs on-prem debate.
This article won’t try to convince you to abandon the cloud or claim that running everything locally is “better.” Cloud and on-prem both have real strengths, real trade-offs, and valid use cases. This guide simply assumes that you’ve chosen to keep some services close to your chest, whether for cost, control, privacy, or curiosity.
This is not a one-size-fits-all solution either.
What you’ll build here is a solid starting point; a practical, secure foundation that works for:
- Most home labs
- Early-stage startup testing/playground
- Solo founders and builders
- Anyone running services from their room or workspace
From here, you can harden, expand, or redesign as your needs grow. At its core, this article is for people who want:
- Their services nearby
- Their data under their control
- Secure access from anywhere
And a network that doesn’t trust everything just because it’s “inside”
If that sounds like you, you’re in the right place. For now, let’s build something secure, practical, and actually usable.
Why You Should Care About Owning Your Network ?
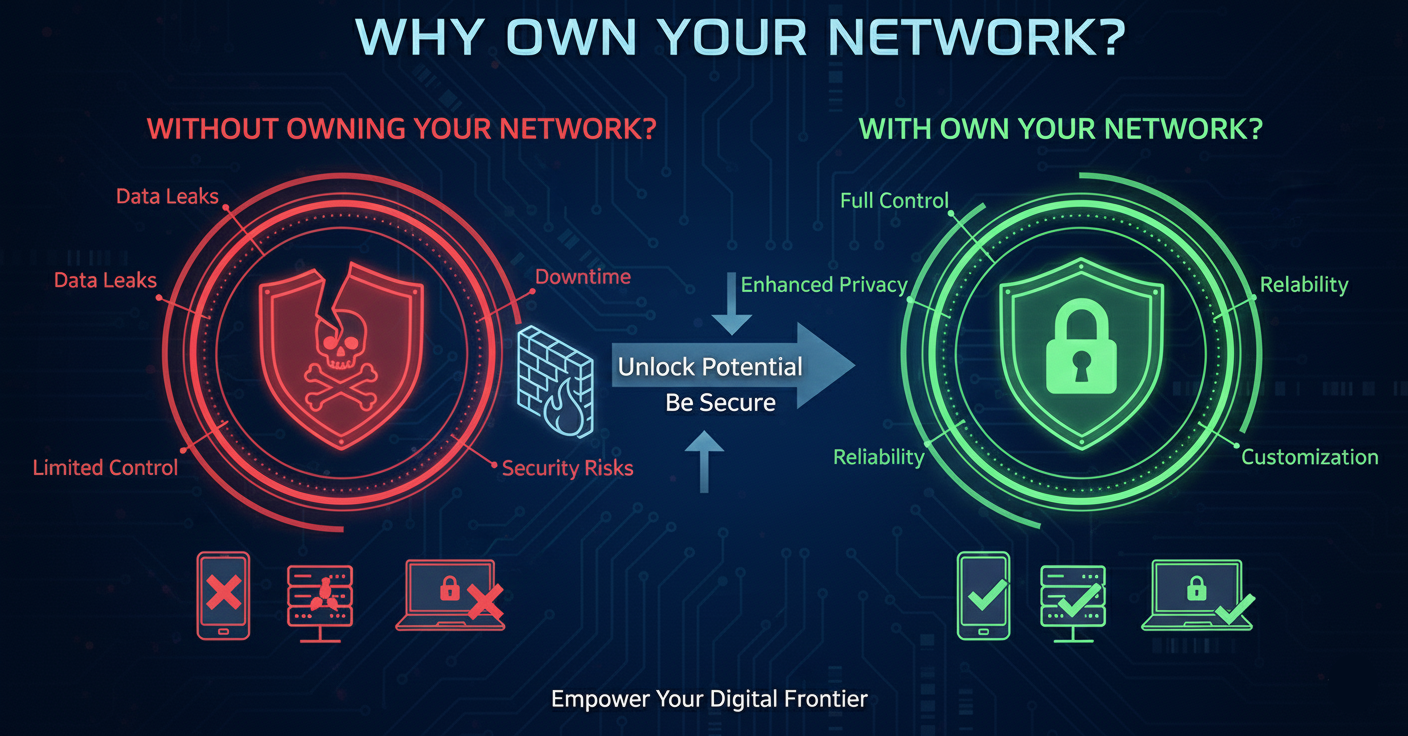
1. Security
The first and most obvious reason is security.
Think of your network like your home. When guests come over, you don’t hand them the keys and say, “Feel free to wander into every room, open every drawer, and plug into whatever you find.” Yet that’s exactly what a flat, poorly designed network does.
In a home lab, a startup, or even a shared apartment, you don’t want every device that joins your Wi-Fi to:
-
See every open port
-
Discover random services you forgot were running
-
Poke at experimental projects you spun up at 2 a.m.
This problem gets worse when you:
-
Live with other people
-
Share a network with personal and work devices
-
Run services that actually matter (or make money)
Even if you live alone, separating “serious infrastructure” from personal devices is just good hygiene. Think of it as putting things in their own drawers. You reduce the risk of mixing traffic, leaking data, or breaking something important because a random device decided to misbehave.
And if you’re hosting revenue-generating applications? You definitely don’t want your homelab experiments interfering with production traffic.
2. Owning Your Services (Without Living in the Cloud)
The second reason is control.
With the right network setup, you can host your own services without blindly relying on big cloud providers for everything. No massive bills. No surprise limits. Just infrastructure you understand and control.
Want your own Google Drive? Set up a NAS. Buy the storage once. Own it forever.
Worried about disk failure? Add redundancy. Use RAID. Design for failure.
Need more capacity? Scale it. Add disks. Add nodes. Go wild.
Even better, you can run workloads locally that would be expensive in the cloud. AI models, data processing jobs, internal tools all perfectly valid reasons to keep compute close to home. (An article on local AI workloads is coming soon.)
The key is this: you don’t have to expose your entire network to the internet to make this work. With proper isolation and tunneling, you can safely access services from anywhere without turning your home network into a public target.
3. And Honestly… Because It’s Fun
Lastly and let’s not pretend otherwise because why not? If you’re a techie, this is half the joy:
- Experimenting
- Breaking things safely
- Learning how real networks actually work
- Building systems you own
This is where theory meets reality, and where you go from “I read about this” to “I built this.”
Security Philosophy: This Is Not Zero Trust (And That’s Okay)

Before we go any further, let’s clear something up. What you’re about to build is not a full Zero Trust network. And that’s not a failure. It’s a conscious, pragmatic choice.
What Zero Trust Actually Means
Zero Trust is often summarized as “never trust, always verify”, but that phrase alone doesn’t really capture how different it is from traditional networks.
In a typical network, even one with VLANs or basic isolation, access works a bit like this:
You need permission to enter the room. Once you’re inside, you can see everything. You might not be able to use everything without credentials, but you can touch it, talk to it, and interact with it.
In networking terms:
- You authenticate to join the network
- Once inside, devices can send packets to each other
- Services rely on application-level authentication to protect themselves
Zero Trust takes a different approach.
Imagine the same room, but now everything inside is locked behind its own fingerprint sensor. Not just the door, the desk, the cabinet, the laptop, even individual files. Being in the room means nothing.
Every request requires:
- Identity verification
- Authorization
- Context such as device health, location, and risk
You don’t get trust just because you’re inside the network. You earn access to each resource explicitly. That is what Zero Trust is really about. No implicit trust based on network location.
The Pragmatic Security Model
Instead of jumping straight to full Zero Trust, this article focuses on a pragmatic security model that dramatically improves safety while not over engineering.
The core ideas are:
Reduce the Attack Surface
Not everything needs to be reachable.
- Internal services stay internal
- Nothing is exposed by default
- Default-deny beats default-allow
Identity at the Edge
Instead of trusting the local network:
- Remote access requires strong identity using VPNs or WireGuard-based tools
- Devices must authenticate before they even see services
- Access is revocable at any time
Controlled Exposure
When something does need to be public:
- Use tunnels instead of open ports
- Avoid direct inbound access
- Place an identity-aware layer in front of services
This approach does not enforce identity at every internal hop, but it removes blind trust at the perimeter, which is where most real-world attacks begin.
Why Most Home Labs and Startups Don’t Run Full Zero Trust
If Zero Trust is so good, why doesn’t everyone use it?
Because full Zero Trust is expensive in time, complexity, and operational overhead.
A proper Zero Trust setup usually requires:
- Strong identity providers everywhere
- Mutual TLS or per-service authentication
- Device posture checks
- Fine-grained policy engines
- Continuous monitoring and enforcement
This makes sense for large enterprises, regulated environments, and organizations with dedicated security teams. For most home labs, solo founders, and early-stage startups, this level of complexity is overkill. You end up spending more time maintaining security infrastructure than building actual products. Worse, a poorly implemented Zero Trust system can be less secure than a simpler, well-understood setup.
Security that no one understands or maintains is just theater.
Network Isolation and Blast Radius Reduction
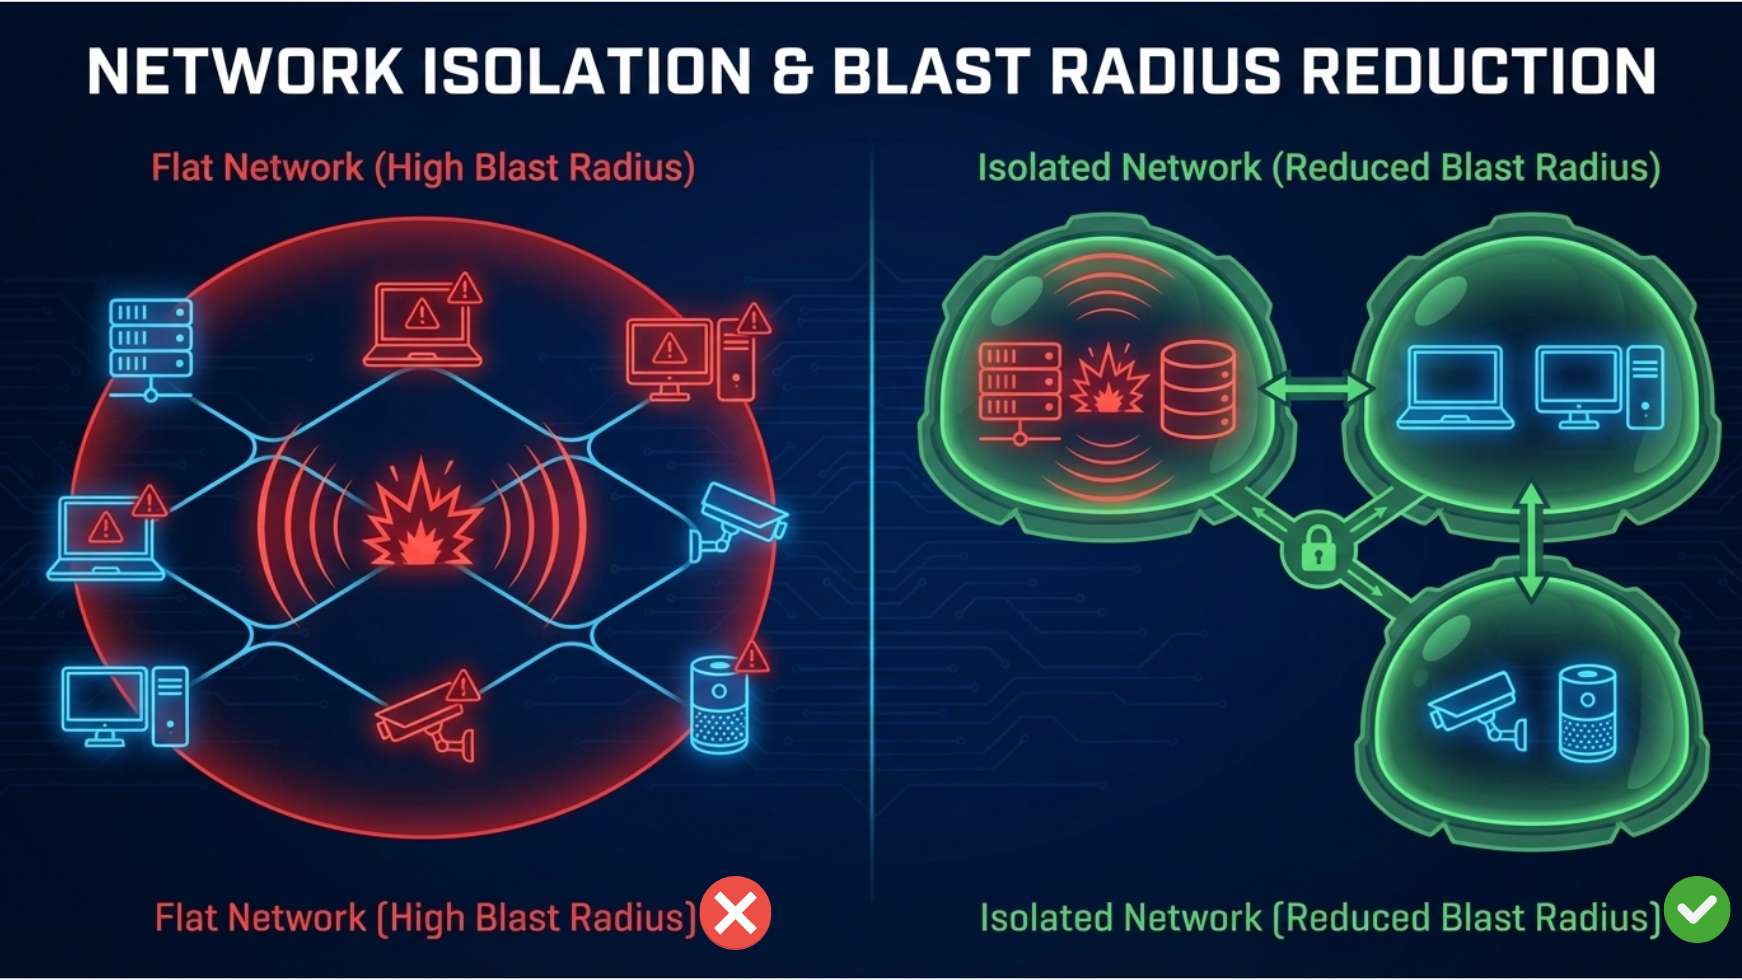
let’s talk about what network isolation actually means in practice.
At its core, network isolation is about containing damage. If something goes wrong, whether that’s a misconfigured service, a compromised device, or an experiment gone sideways, the impact should be limited to a small, controlled area. This is what people mean when they talk about reducing blast radius.
In a flat network, every device can see and talk to every other device. One mistake can ripple across everything. With isolation, failures stay local.
What Network Isolation Means in Practice
With an isolated network:
- Devices inside the isolated network can communicate with each other
- Devices outside the isolated network cannot initiate connections into it
- Internet access is allowed, but inbound access is blocked by default
- One compromised device does not automatically expose everything else
Think of it as creating a private bubble inside a larger, untrusted environment.
Why We Are Using a Router
There are multiple ways to achieve network isolation:
- VLANs with managed switches
- A dedicated firewall appliance
- An old PC or Raspberry Pi acting as a router
All of these are valid, but if this is your first time designing a network or thinking about topology, they introduce extra complexity.
For this guide, we are choosing the simplest and most cost effective approach: a dedicated travel router.
A small travel router gives you:
- Physical separation
- Built-in firewalling
- Simple management
- Low power usage
- Minimal space requirements
Yes, this does mean buying a device, but the cost is low and the security benefits are immediate.
For this article, I will be using the GL.iNet GL-SFT1200 (Opal) Secure Travel WiFi Router, but any router that supports:
- WiFi repeater mode
- Basic LAN configuration
- VPN client support (Optional)
will work just fine.
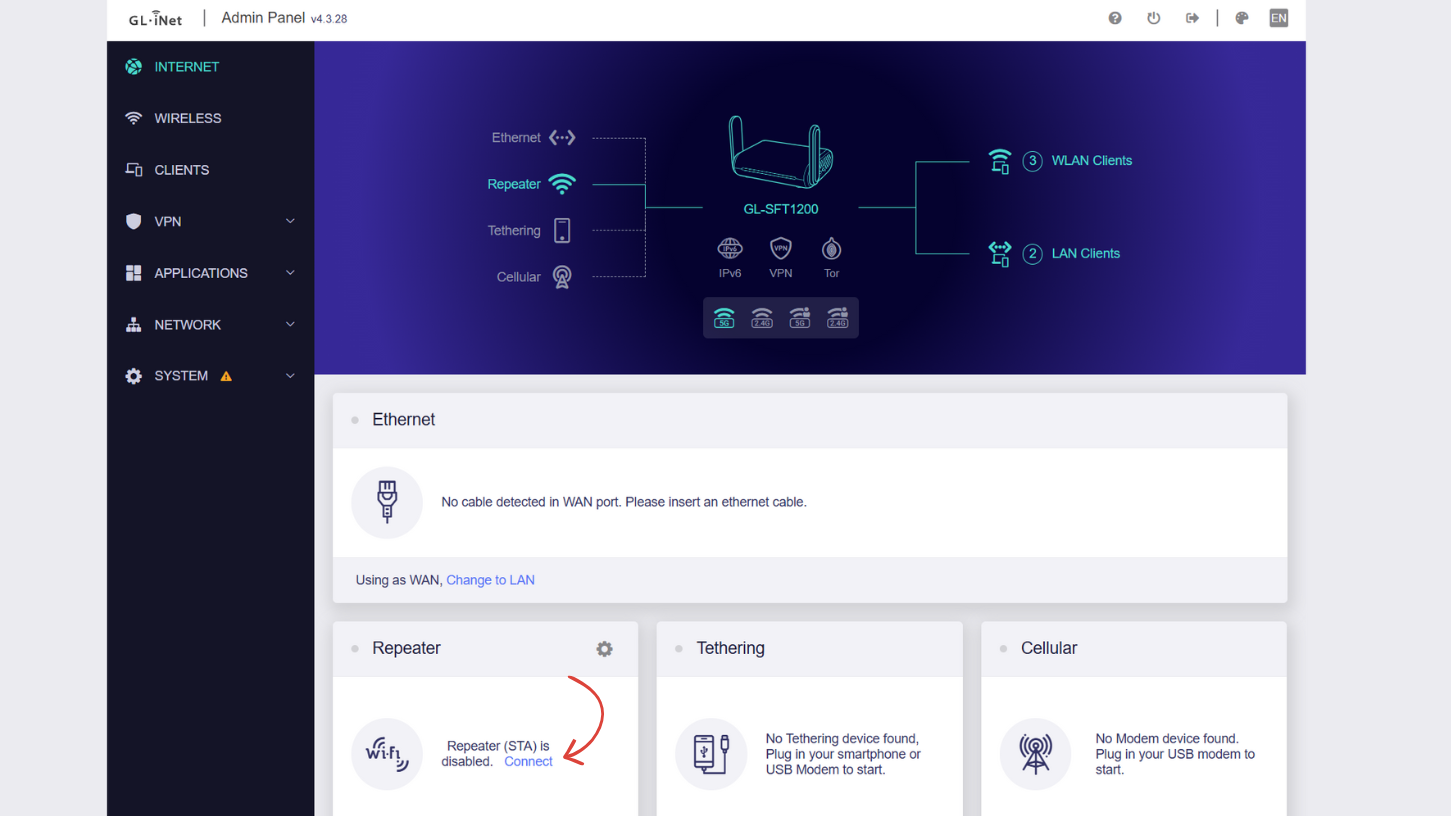
Step 1: Power Up and Connect to the Router
Power on your router.
Once it boots, it will broadcast a WiFi access point using default credentials. You can find these on:
- The router itself
- The box
- The instruction manual
Connect to this access point from your laptop or phone.
Step 2: Connect the Router to Your Existing Network
Log in to the router’s admin interface, instructions are also on the box or you will be prompted open navigating to the webui portal.
Navigate to the Internet or Repeater section. The exact naming may vary by vendor, but the goal is the same.
Here, you will:
- Scan for available WiFi networks
- Select your existing home or office network
- Enter the WiFi password
This grants internet access to your new isolated network without giving your home network access back in.
At this point, your setup looks something like this:
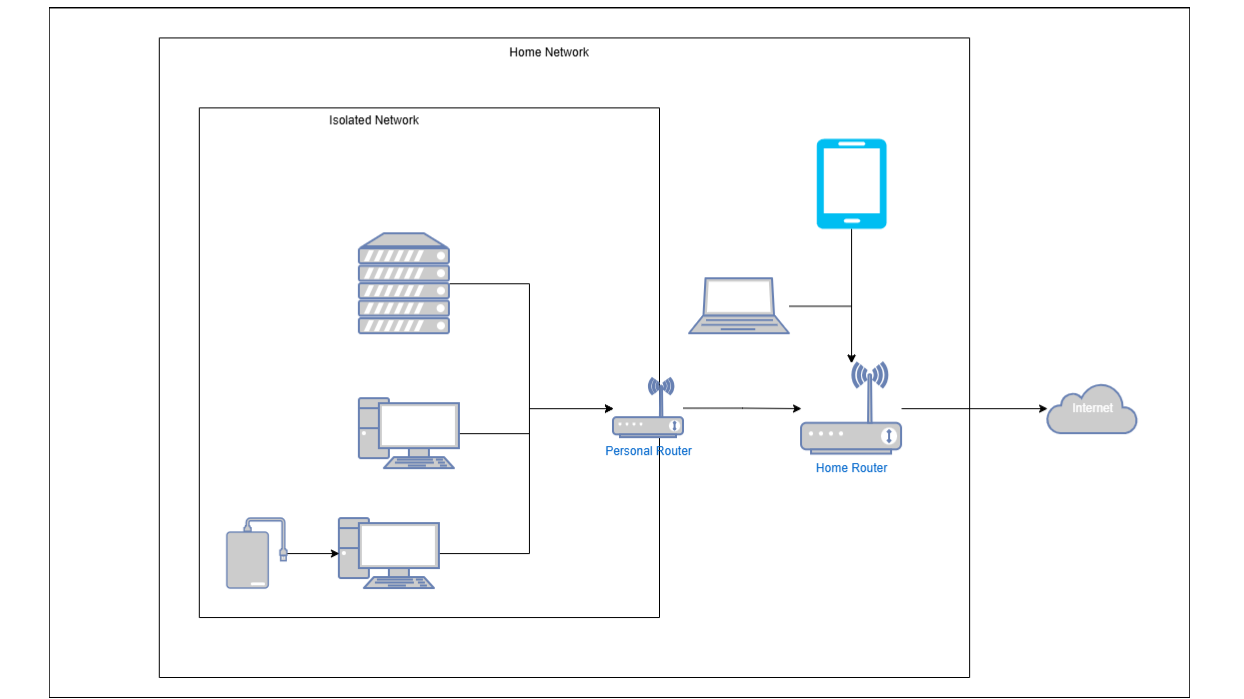
Traffic can flow outward, but not inward.
Step 3: Check the Router’s WAN IP Address
Next, we need to confirm how your router is seen by the upstream network.
In the repeater or internet status section, note the IP address assigned to your router.
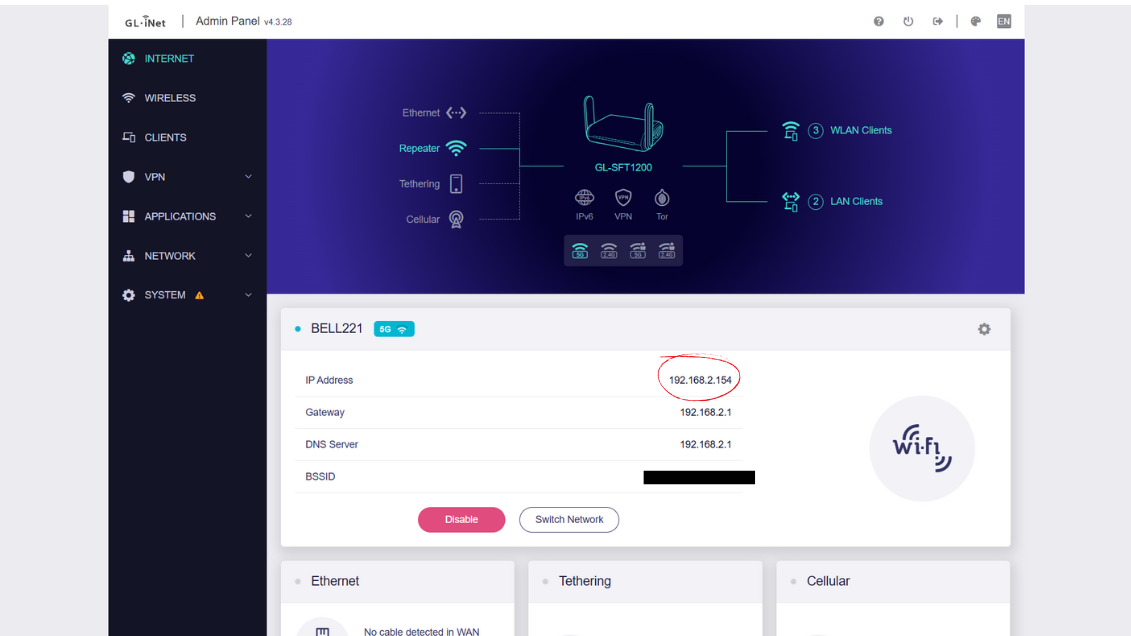
This address tells you which network your router is connected to and helps avoid address conflicts in the next step.
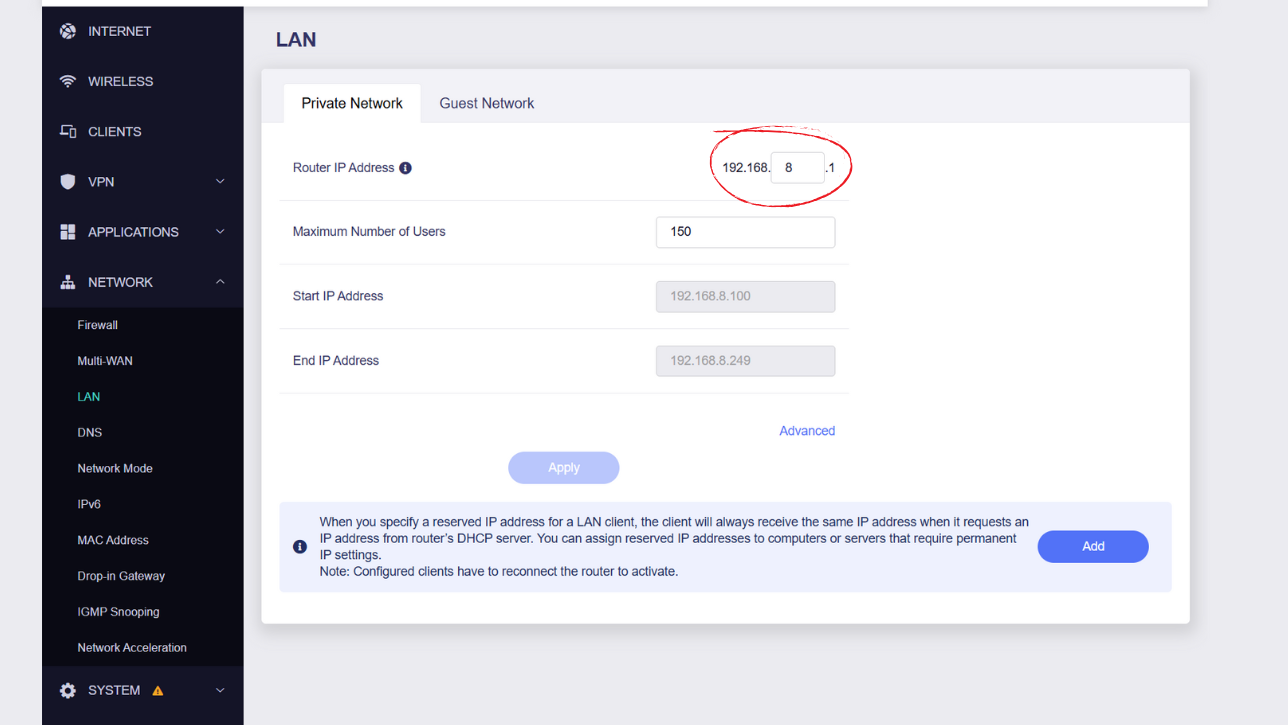
Step 4: Configure the LAN Network to Avoid IP Collisions
Now navigate to the LAN or Network configuration section of the router.
Here, you will see the router’s internal IP address and subnet. Common defaults look like:
- 192.168.8.1
- 192.168.10.1
What matters is this: The LAN network must be different from your home or office network.
For example:
- Home network: 192.168.1.0/24
- Isolated network: 192.168.8.0/24
This separation ensures:
- No IP conflicts
- Clear routing boundaries
- Proper firewall behavior
Once configured, the router becomes a hard boundary.
Devices on your home network cannot initiate connections into your isolated network. Your router acts as a firewall, blocking unsolicited inbound traffic by default.
What You Have Achieved So Far
At this stage:
- You have created a separate network with its own address space
- Devices inside the network can talk to each other
- Devices outside the network cannot access it
- Internet access works normally
- The blast radius of failures is significantly reduced
This is the foundation everything else in this article will build on.
Next, we will layer secure remote access on top of this isolation without punching holes in the network.
Secure Remote Access with Tailscale
This is where things start to get a bit more technical, but also where the setup becomes really powerful.
Before we jump into commands and configuration, let’s talk about why we are using Tailscale or a similar cloud-assisted solution instead of the traditional approaches like port forwarding or running a self-hosted WireGuard server directly on the router.
Why Not Port Forwarding or a Self-Hosted VPN?
In an ideal world, you would:
- Run a WireGuard server on your router
- Forward a UDP port
- Connect directly from anywhere
In reality, this often breaks for reasons completely outside your control. I assume the worst-case scenario here so that this setup works regardless of how your internet connection is structured.
There are two common situations where port forwarding simply does not work.
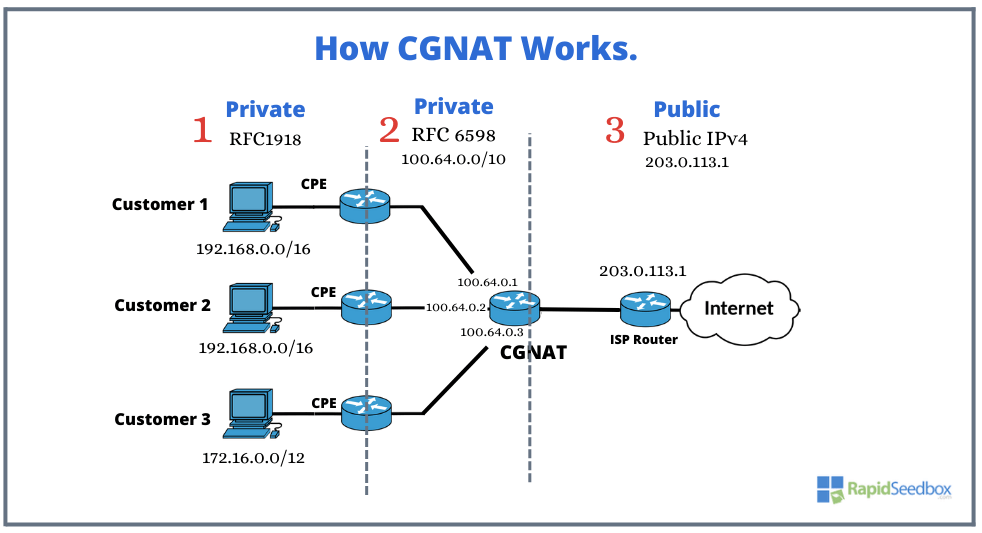
Situation A: Carrier Grade NAT (CGNAT)
Some ISPs use Carrier Grade Network Address Translation. This means:
- You do not actually have your own public IP address
- You are behind one or more ISP-controlled routers
- Multiple customers share the same public IP
In this setup, even if you configure port forwarding on your router, inbound traffic never reaches you. The ISP routers upstream will drop it before it gets anywhere close to your network.
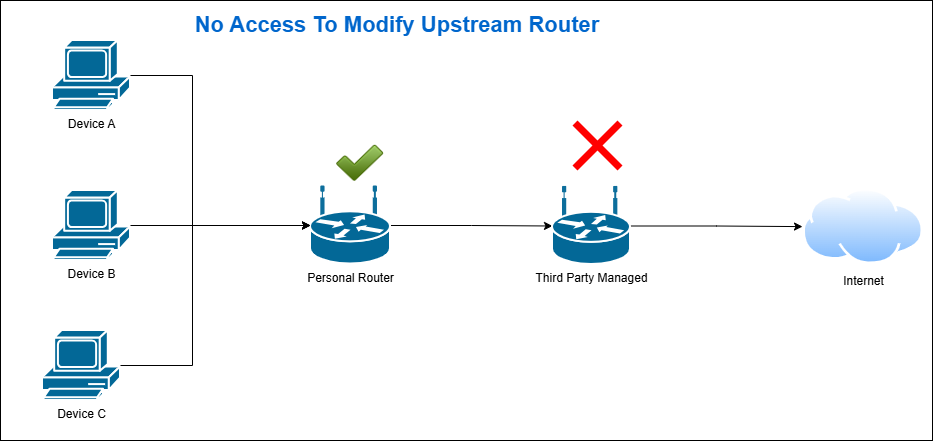
Situation B: No Access to the Upstream Router
This is very common in apartments, shared housing, or managed buildings.
Your isolated router is connected to:
- A home or building router you do not control
Even if you enable port forwarding on your isolated router, traffic will still be blocked unless the upstream router also forwards the port. If you do not have access to that router, you are stuck.
In the worst-case scenario, both CGNAT and lack of router access apply.
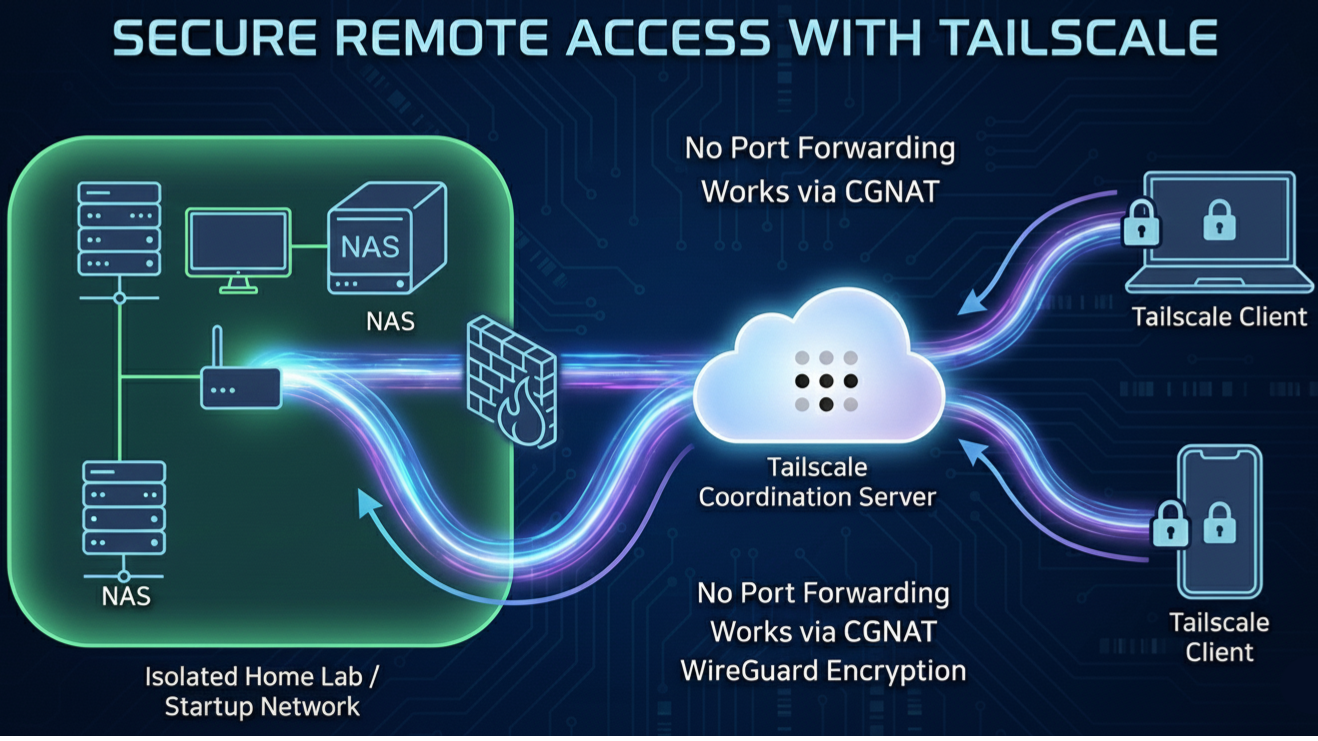
The Core Idea: Outbound Tunnels
So how do we solve these head-scratching situations?
Instead of waiting for inbound connections, we flip the model.
We create an outbound tunnel.
Your network initiates a connection to the cloud and keeps it alive. Since this is outbound traffic, it is allowed by:
- Stateful firewalls
- Upstream routers
- CGNAT setups
Once that connection exists, it can be used to securely route traffic back in.
You could do this with a VPS acting as a relay, but that adds cost and maintenance overhead. Services like Tailscale give you the same end result with far less effort.
Tailscale uses WireGuard under the hood, so performance is excellent and security is strong. The cloud component is not a traditional VPN server. It acts as a coordination service, helping devices discover each other and establish peer-to-peer connections whenever possible.
This is not a classic hub-and-spoke VPN model. Most traffic flows directly between devices, with the cloud stepping in only when direct connectivity is not possible.
This approach also gives us some major benefits:
- No port forwarding
- No public IP required
- No dynamic DNS to manage
- Very low operational overhead
Unless Tailscale itself is down, your access works. And if that happens… well, even large cloud providers have bad days. I still remember that AWS outage in 2025.
For a deeper dive into how this works, check out the official explanation: https://tailscale.com/blog/how-tailscale-works
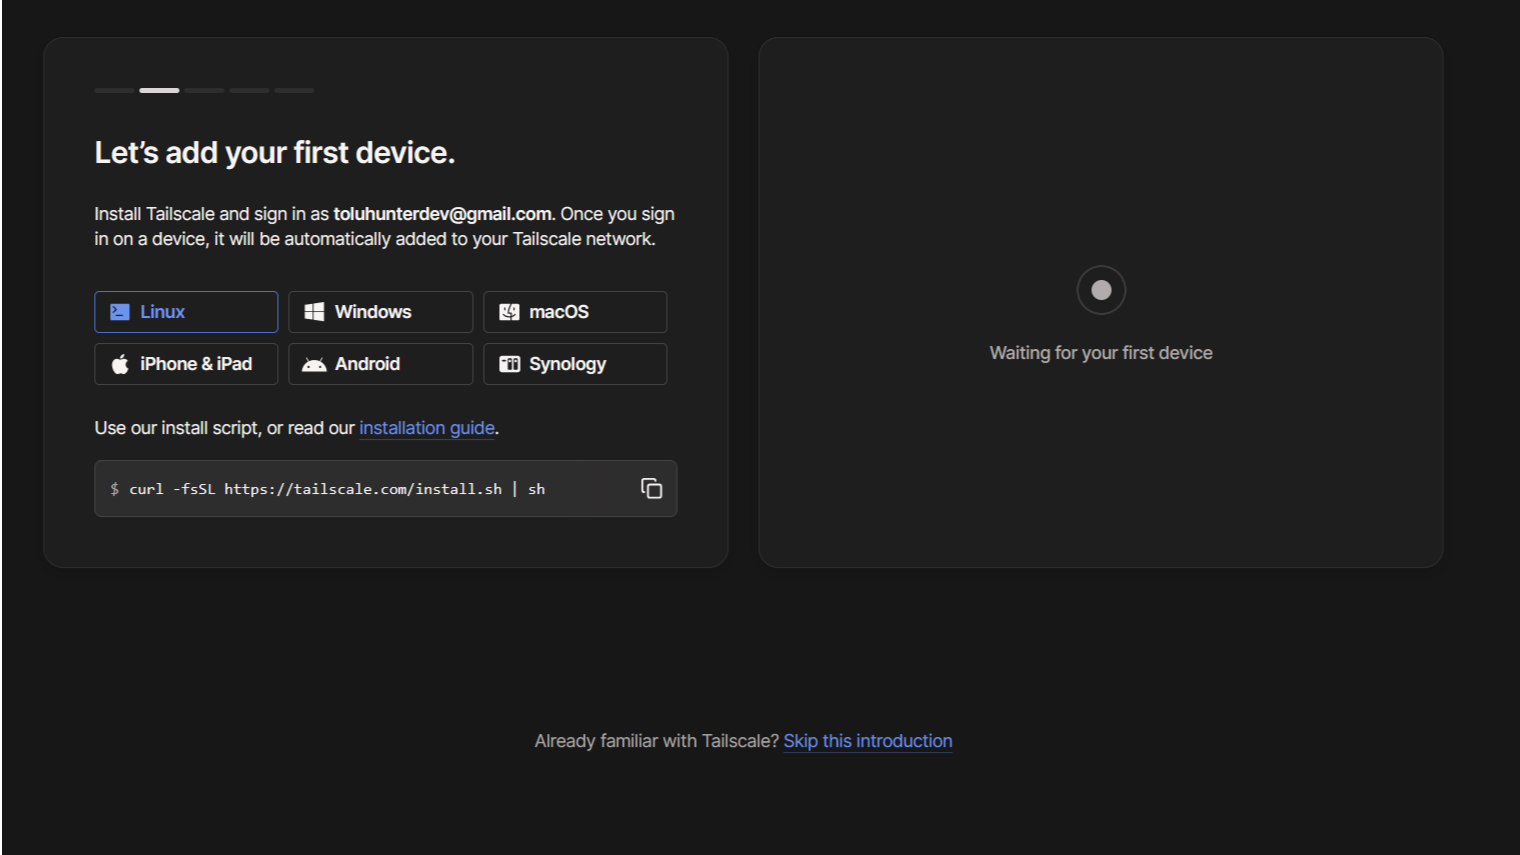
Creating a Tailscale Account
First, create a Tailscale account: https://tailscale.com/
Once logged in, you will see a page showing waiting for devices.
Why We Are Not Installing Tailscale on the Router
You might be wondering why we are not installing Tailscale directly on the travel router.
Technically, you can. Many travel routers, including GL.iNet devices, run OpenWRT and support Tailscale.
Practically, this is not a great idea.
Travel routers are very limited in CPU and RAM. Installing Tailscale might work for a simple test, but as soon as you start routing real traffic, memory usage can spike. When that happens, the operating system may kill the Tailscale process, breaking your connectivity.
For reliability, we will instead use a device inside the isolated network to advertise routes.
Good candidates include:
- A Raspberry Pi
- A small server or NAS
- A Linux box that stays online
- Even a Mac, Windows machine, or Android device
I strongly recommend using a device that:
- Lives permanently inside your network
- Does not frequently leave the premises
Yes, you could go down the extreme route of rebuilding a smaller Tailscale binary for constrained devices. If you do that, please tell me how it went. I will not be joining you on that adventure.
If you are curious, here is the relevant documentation: https://tailscale.com/kb/1207/small-tailscale
Installing Tailscale on the Target Device
For this article, we will use Linux. Documentation for other operating systems can be found here: https://tailscale.com/kb/1019/subnets
On the target device, install Tailscale with:
curl -fsSL https://tailscale.com/install.shEnabling IP Forwarding
This device will act as a lightweight routing point for your isolated network, without being a full router.
To do this, we need to enable IP forwarding.
IP forwarding allows a device to accept packets not addressed to it and forward them to the correct destination.
Run the following commands:
echo 'net.ipv4.ip_forward = 1' | sudo tee -a /etc/sysctl.d/99-tailscale.conf
echo 'net.ipv6.conf.all.forwarding = 1' | sudo tee -a /etc/sysctl.d/99-tailscale.conf
sudo sysctl -p /etc/sysctl.d/99-tailscale.confBringing Up Tailscale and Advertising Routes
Now bring up Tailscale and advertise your internal network:
sudo tailscale up --accept-dns=false --advertise-routes=<YOUR LAN NETWORK>/24Replace <YOUR LAN NETWORK> with the subnet of your isolated network.
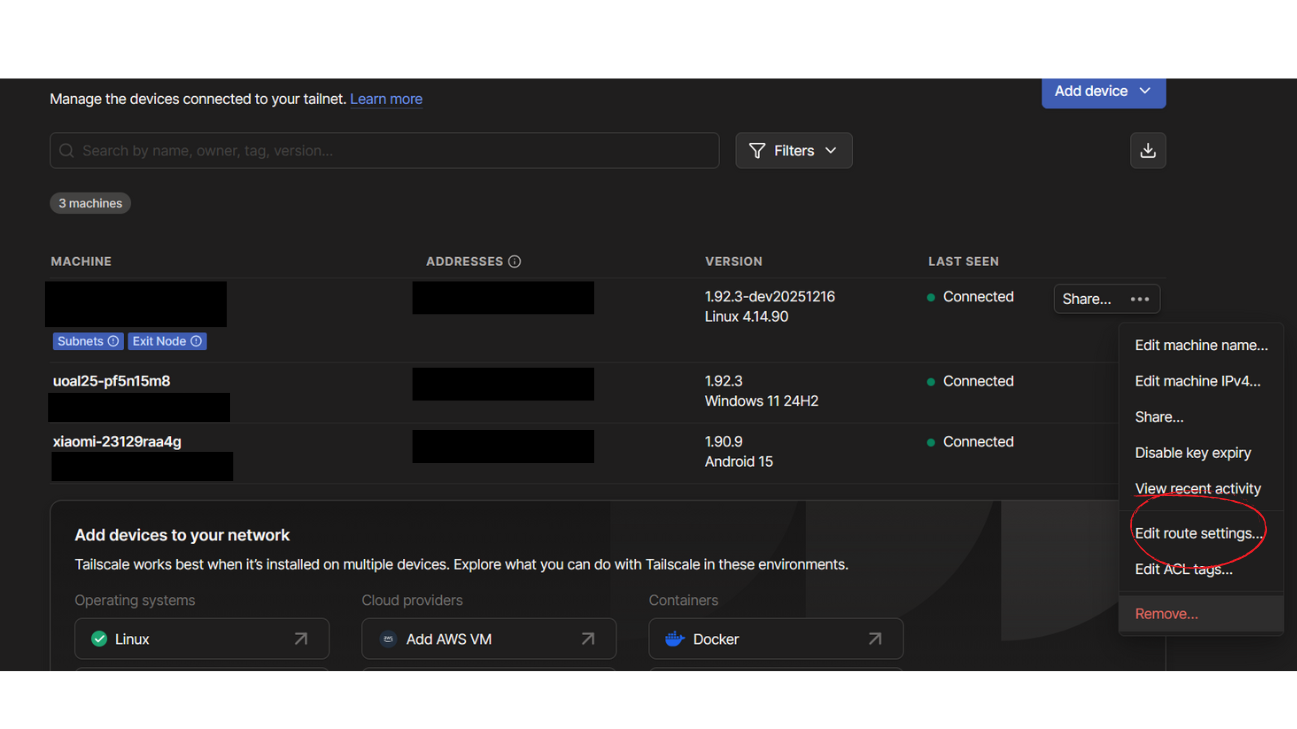
Approving Routes in the Admin Console
Go back to the Tailscale admin console.
You will see the new device appear with advertised routes. Edit the device settings and approve the advertised routes.
Once approved, those routes become reachable through Tailscale.
What You Have Now
At this point:
- Your isolated network is reachable from anywhere
- No ports are exposed to the internet
- No router configuration is required upstream
- Access is tied to device identity
- Access can be revoked instantly
To connect remotely, simply install Tailscale on your laptop, phone, or other device and authenticate.
Tailscale supports up to 100 devices for free, which is more than enough for most home labs and early-stage startups.
From here, we can start talking about exposing specific services safely rather than entire networks.
Exposing Internal Services Safely with Cloudflare Tunnels
So far, everything we have done keeps services private and accessible only through your isolated network or VPN. Sometimes though, you want a service to be reachable by anyone on the internet without opening ports or punching holes in your firewall.
This is where Cloudflare Tunnels come in.
The idea is similar to what we did with Tailscale:
- Your service makes an outbound connection
- Cloudflare keeps that connection alive
- Requests come in through Cloudflare, not directly to your network
No port forwarding. No public IP. No router configuration.
We are using Cloudflare because it supports both:
- Users who already own a domain on Cloudflare
- Users who just want a quick, random URL for testing
Our Example Service: Nginx
To keep things simple, we will expose a basic web service using Nginx with its default configuration.
For this article, I will use the same Raspberry Pi that is already running Tailscale. You can do the same, or use:
- Any device inside your isolated network
- Any service you want to expose
On most Linux distributions, Nginx is available in the default repositories.
If you are on a Debian or Ubuntu-based system, install Nginx with:
apt install nginxIf you already have Nginx installed, as I do on my NAS, you can skip this step.
Method 1: No Cloudflare Account or Domain
This method is useful for:
- Testing
- Temporary demos
- Users without a domain
- Users who do not want to manage DNS
The tradeoff is that you receive a random URL, which is not ideal for long-term use.
Install cloudflared
Install cloudflared using the official documentation: https://developers.cloudflare.com/cloudflare-one/networks/connectors/cloudflare-tunnel/downloads/
Start a Quick Tunnel
Once installed, run the command below. Change the port if your service is running on a different one.
cloudflared tunnel --url http://localhost:80Cloudflared will output a public URL that you can open from anywhere to reach your service.
At this point:
- No inbound ports are exposed
- Your router configuration remains unchanged
- The service is reachable only through Cloudflare
Method 2: Using Your Own Domain on Cloudflare
This is the recommended approach for anything beyond testing.
Create a Cloudflare Account
If you do not already have an account, sign up here: https://www.cloudflare.com/
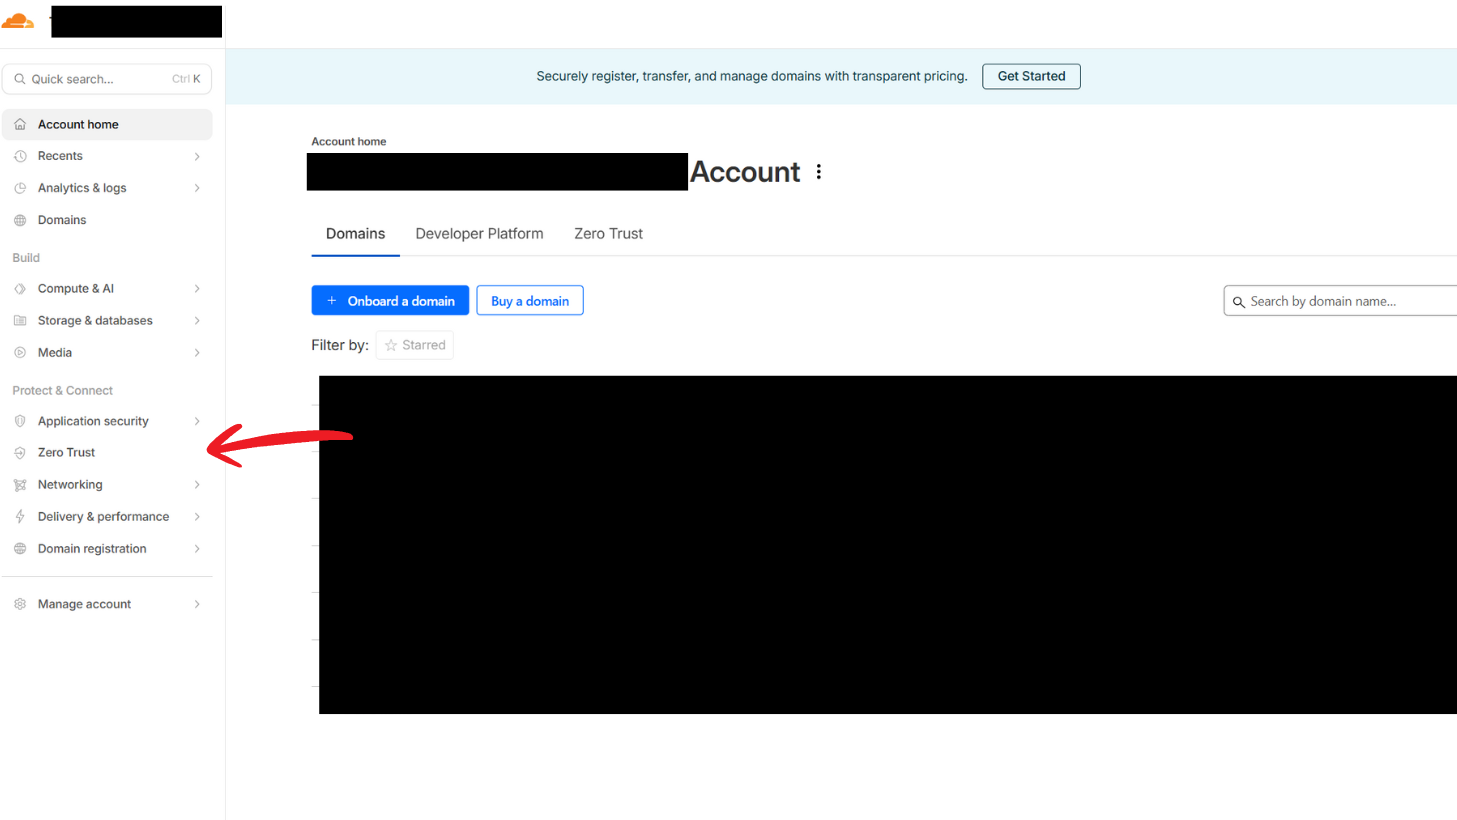
Once logged in, navigate to Zero Trust.
Create a Tunnel Connector
Inside the Zero Trust dashboard:
- Go to Networks
- Select Connectors
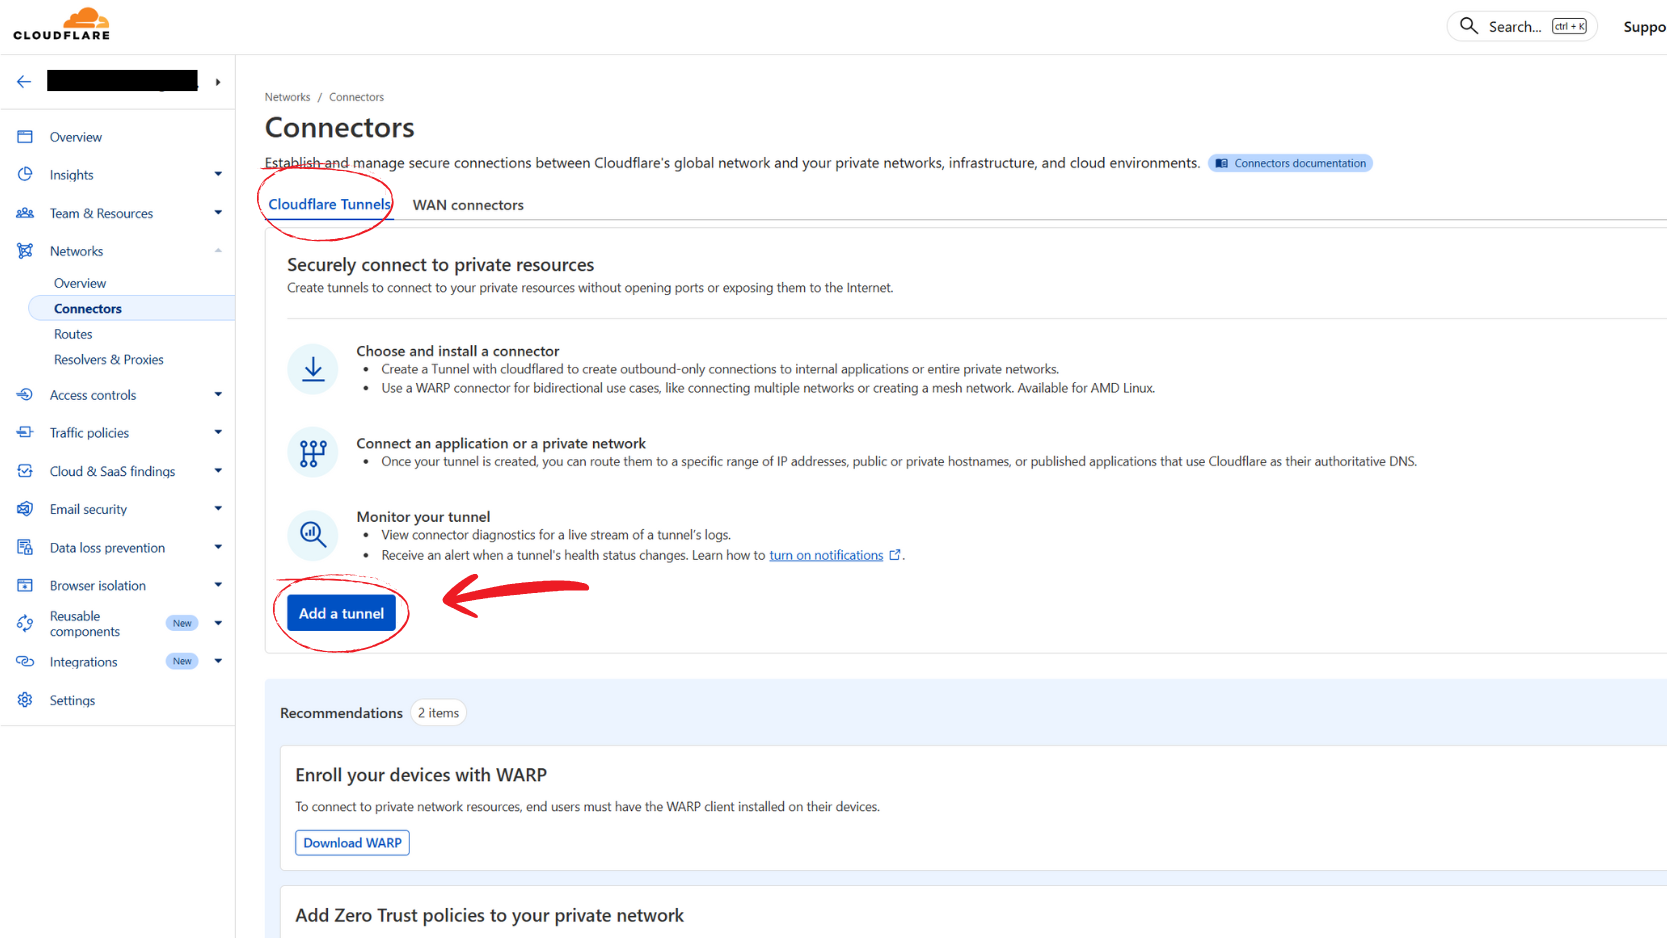
Choose cloudflared as the connector type.
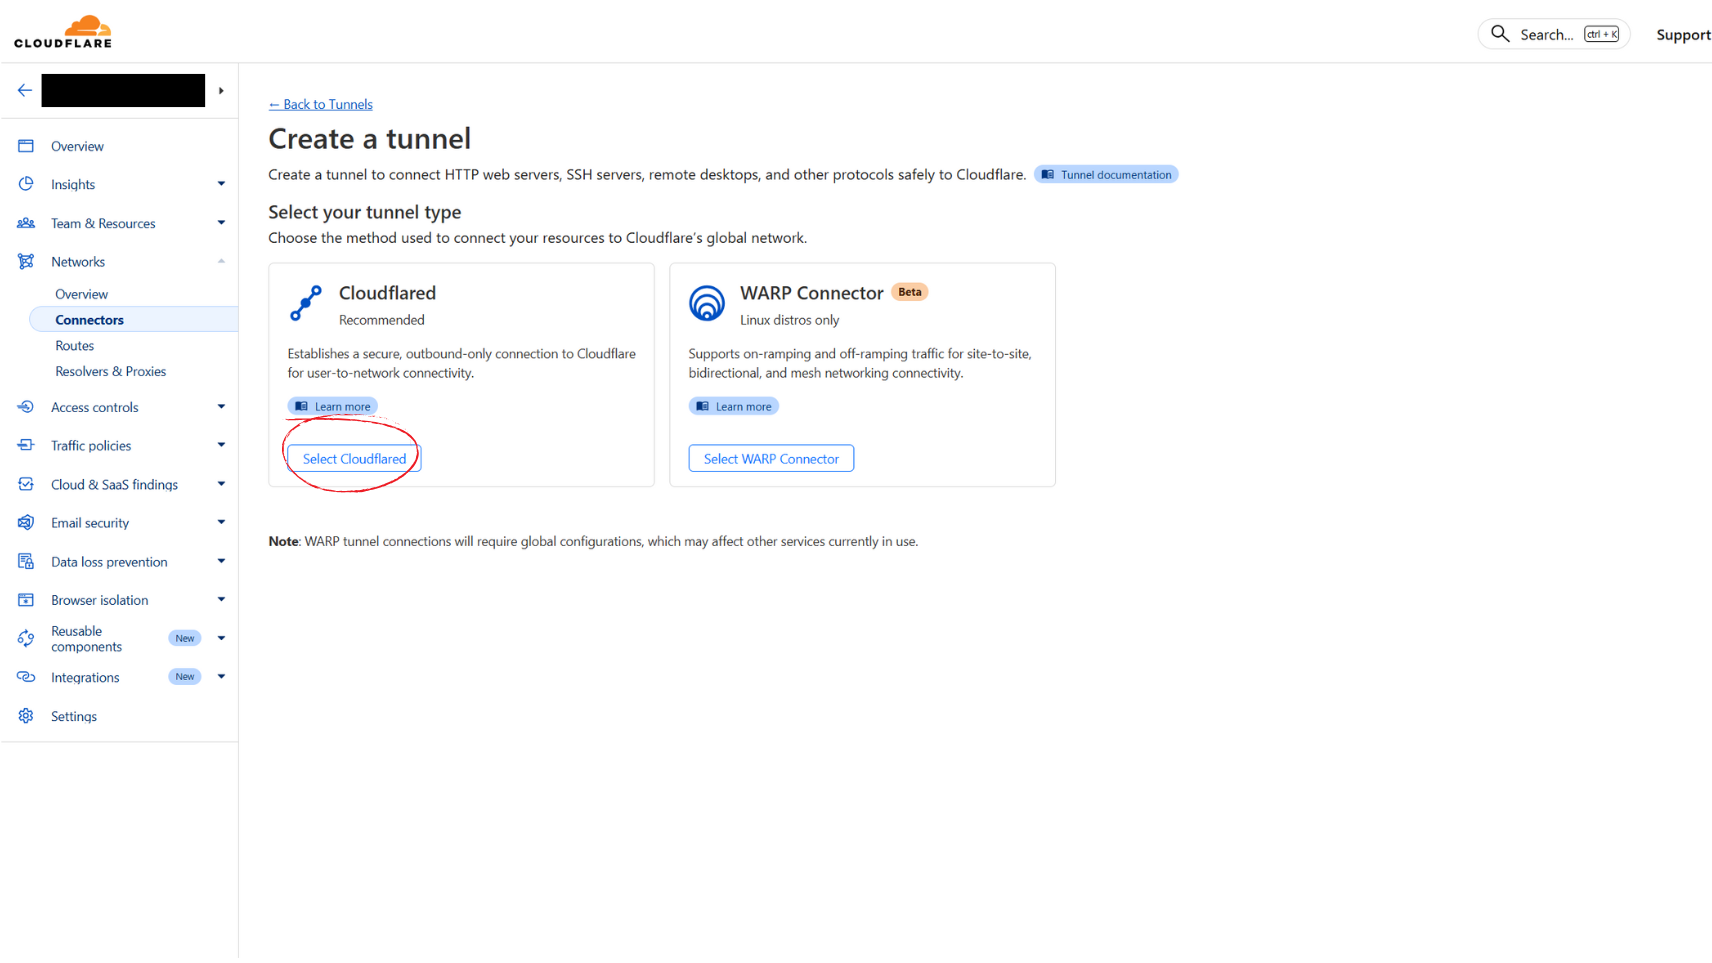
Give your tunnel a name.
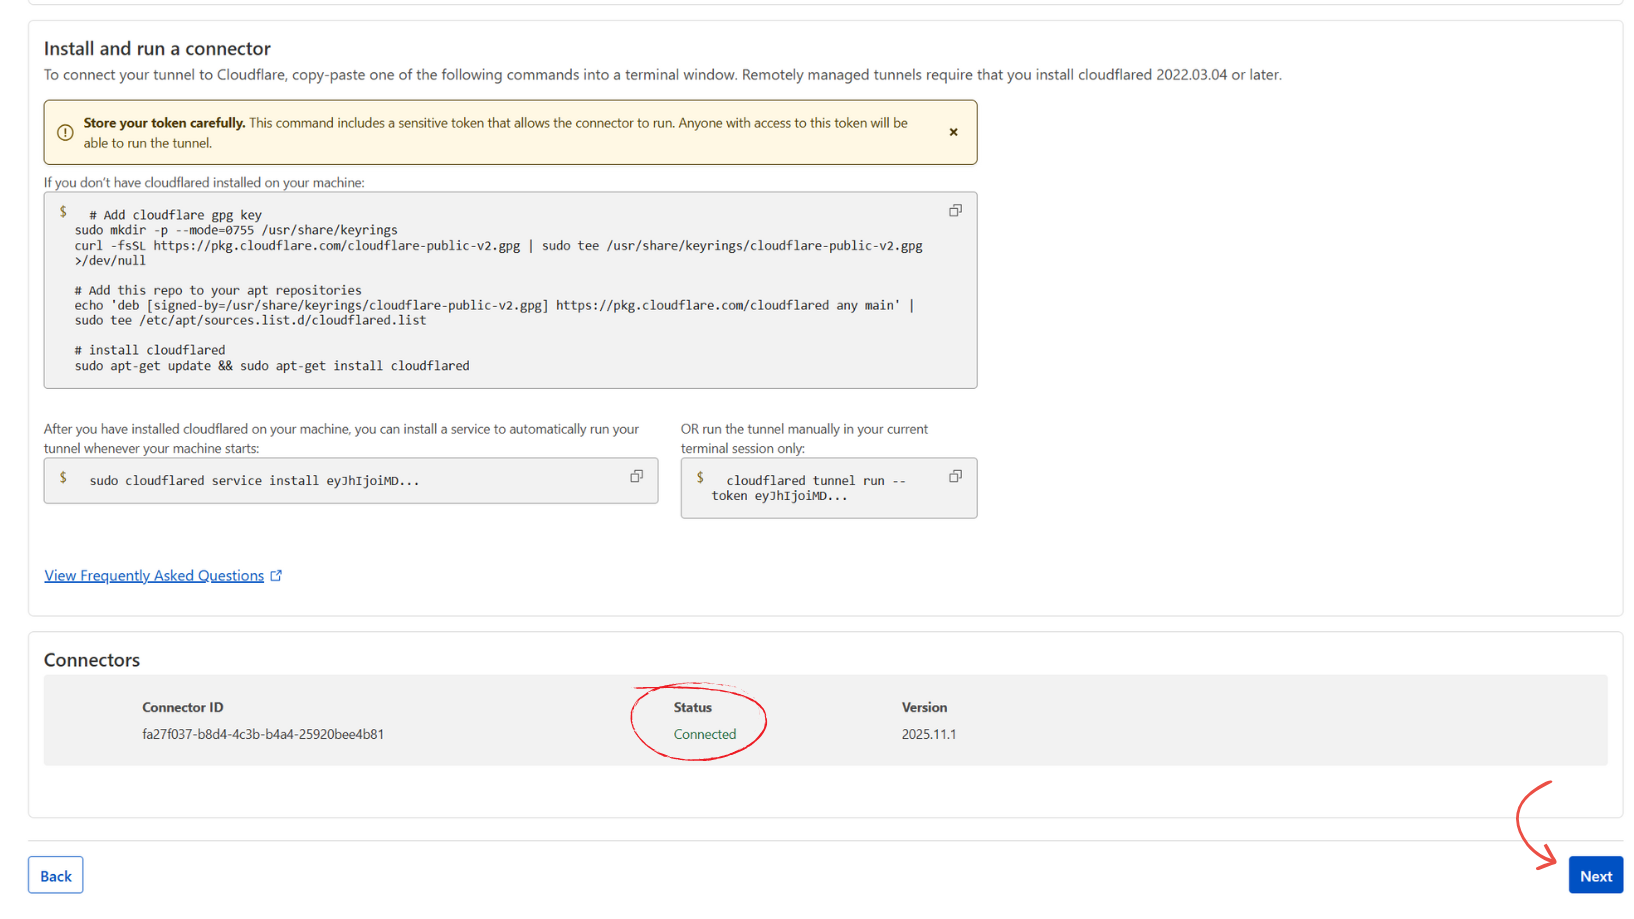
Cloudflare will then display installation instructions for your operating system. Select the correct OS for your target device and follow the steps to install and register the tunnel.
Once completed, the connector becomes active then you can proceed to the next step.
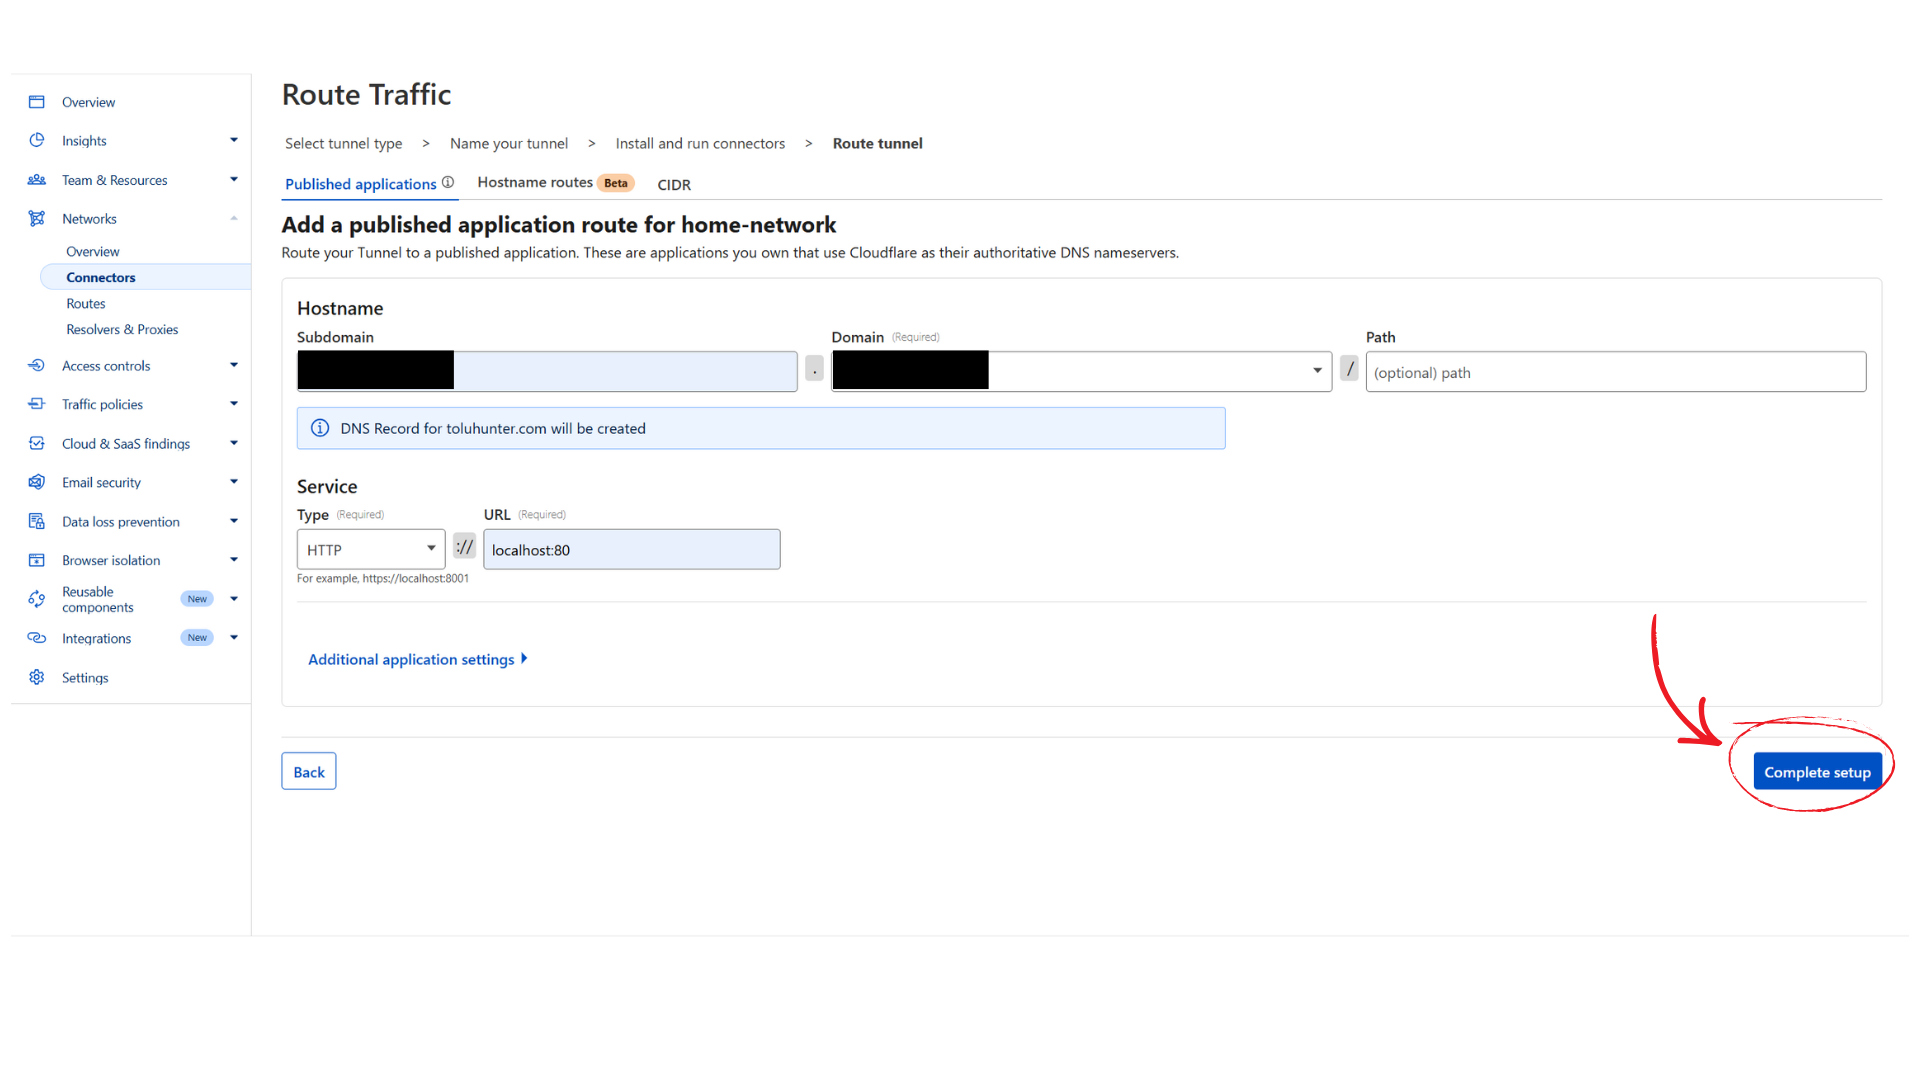
Route Traffic Through the Tunnel
Next, configure the tunnel routing:
- Enter a subdomain
- Select a valid domain from your Cloudflare account
- Choose the protocol
Since this example uses the default Nginx configuration, http is sufficient. For long-term deployments,
you should configure SSL and use https. That is outside the scope of this article.
Set the service address to:
localhost:80Once saved, the service is now exposed through your custom domain.
Taking the Service Down
To stop exposing the service:
- Go back to the Zero Trust dashboard
- Under Connectors, delete the tunnel
To ensure the service is fully removed from the host, uninstall the cloudflared service:
sudo cloudflared service uninstall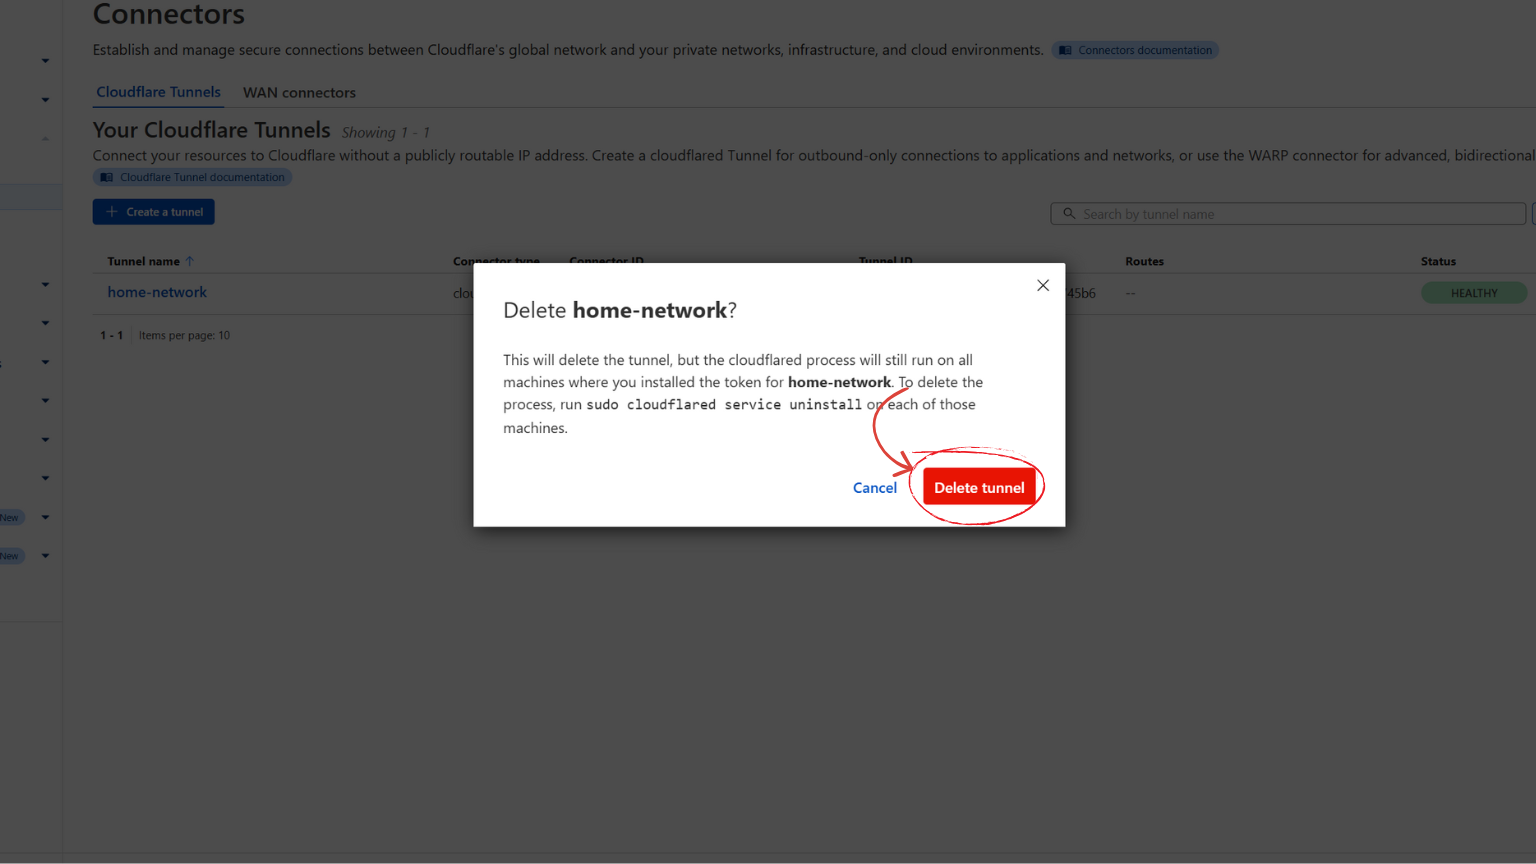
What You Have Achieved
With Cloudflare Tunnels:
- No inbound ports are opened
- Your internal network remains isolated
- Services are exposed selectively
- Exposure can be enabled or disabled instantly
Combined with VPN-based access for internal services, this gives you a clean and secure way to publish only what you intend to share with the internet.
Conclusion
You’ve now walked through a practical, modern way to secure and expose services in your home lab or startup network without relying on risky port forwarding or a traditional VPN that assumes trust once you are inside a perimeter. What you have built:
- Strong network isolation with a dedicated router creating a separate, protected segment for your critical devices and services
- Secure remote access using Tailscale that works regardless of upstream network constraints like CGNAT or lack of router control, allowing authenticated devices to connect privately
- Controlled public exposure of specific services using Cloudflare Tunnels, giving you a way to safely reach selected applications from the internet without opening firewall ports or exposing your home IP
Your network now:
- Forces identity at entry for remote connections
- Keeps internal devices unreachable from untrusted networks
- Lets you expose only what you explicitly choose
This setup dramatically reduces your attack surface compared with a flat network where every device can see every other device, or a naive VPN setup where once connected everything is implicitly trusted. It also does not require advanced or expensive hardware and works in the real world given typical residential and shared internet constraints.
It is equally important to be clear about what this setup does not protect against:
- It does not enforce identity verification for every internal service request. Devices inside your isolated network can still communicate with each other by default, and services must still implement their own authentication and authorization.
- It is not a full Zero Trust architecture. True Zero Trust requires per-request verification, microsegmentation, strict least privilege policies, and continuous enforcement, which are outside the scope of this article.
- Exposing services through Cloudflare Tunnels does not automatically secure the application itself. Weak credentials, vulnerable code, or misconfigured services can still be exploited if not properly hardened.
- If a trusted device connected through Tailscale or a service exposed via Cloudflare is compromised, an attacker may gain access within the allowed scope of that device or service unless credentials are properly managed and revoked.
Despite these limitations, this approach represents a strong, modern, and pragmatic security model. It significantly improves security over traditional perimeter-only designs while remaining accessible to home labs and early stage startups.
You now have:
- A private, isolated internal network
- Reliable remote access that works anywhere
- Safe, controlled exposure of public services
As your environment grows, you can evolve this foundation with tighter access controls, identity-aware policies, and deeper segmentation. For now, this setup strikes a practical balance between security, cost, and operational simplicity without pretending to solve threats it is not designed to address.
Here's an ending statement for you, I have given you knowledge, but in return I have taken something from you. Your excuses, no more is cloud complexity & cost an issue, it may not be perfect but it's a start. Build and have fun